|
How to install Secure Net client
Follow the instruction below to install Secure Net client program to the computer:
- Download Secure Net installation file (download link);
- Run the installation file;
- Follow the installation program instructions;
- Secure Net is ready to use after the installation.
How to start with Secure Net
Follow the instruction below to start work with Secure Net:
- Run installed Secure Net program and wait for the activation window (Screenshot 1);
Each computer have Secure Net installed for the first time should be added to the list of active computers.
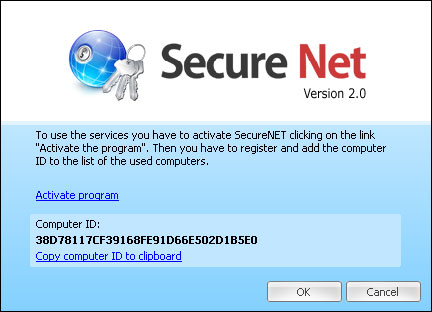 |
| Screenshot 1: The Secure Net activation window. |
- Click on the "Copy computer ID to clipboard" link;
- Click on the "Activate program" link;
The "Sign in" page of www.gosecure.eu will open after clicking. If it is not, see the "Appendix 1" at the page end.
- Sign in at the "Sign in" page or create a new account if you don't have one yet;
The "Secure Net account management" page will open after signing in. If it is not, please see the "Appendix 2" at the page end.
- Paste the your computer ID to the "Computer ID" field from the clipboard;
If the clipboard doesn't contains the computer ID, click on the "Copy the computer ID to clipboard" link again.
- Choose the prefer Internet connection speed;
- Click the "Add computer" button;
- Wait 5 or more minutes and then press the "OK" button in Secure Net program window (Screenshot 1);
- At this point Secure Net tries to establish connection with our VPN server;
If it's any problems with the connection, please contact us.
- When the connection will be established the connection status in the Secure Net program will be changed to the "Connected".
Appendix 1
If the "Sign in" page wasn't open click the link below and go next instruction point.
http://www.gosecure.eu/cart/login.php?id=snet
Appendix 2
If the "Secure Net account management" page wasn't open click the link below and go next instruction point.
http://www.gosecure.eu/cart/smedit.php
Back to Secure Net page
Back to page top
|